Please configure
Set up Fibre
Find out how to get Spark Fibre broadband. If you already have Fibre installed and want to sign up to Spark, you can buy a broadband plan and skip to step 7 below to set up your modem.
Fibre gets installed by a Local Fibre Company. These companies are Chorus, Tuatahi First Fibre, Enable, Unison and Northpower. Spark will be in touch during your installation. You'll also hear from your Local Fibre Company.
Note: Chorus wait times for new Fibre installations across NZ are significantly longer than usual. Estimated wait times in some areas are of approximately 30 to 75 days. This is an evolving situation, and we will continue to provide updates.
Before you order, check out the Understand Fibre page to see what you need to consider.
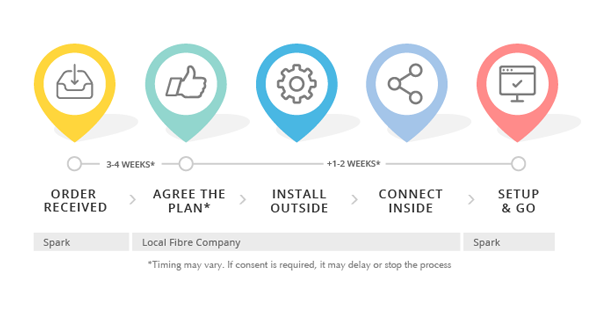
1. Order Fibre from Spark
Sign up to one of Spark's Fibre options when purchasing broadband. Buy a Fibre Broadband plan
Find out what to consider when getting Fibre. Understand Fibre
Once you've signed up for Fibre, we'll pass your order to your Local Fibre Company. They'll work with you to install Fibre in your premises.
Spark will courier the modem to you before your installation date. Your Local Fibre Company will supply other equipment.
If you already have Fibre connected with a different service provider you can transfer it to Spark. Find out more
Landline and alarm options
Once you’re connected to Fibre, your existing Copper landline will stop working. Your devices won't work in existing phone jackpoints. In order for them to work you can ask for integrated wiring when you order.
This may also affect devices like security or medical alarms, faxes or SKY TV. Contact the provider of the device to check if it's compatible.
2. Get consent / landlord permission
If you live down a right of way or in a multi-dwelling unit you'll need to get consent to install Fibre. If you rent you'll also need approval from your landlord. The Local Fibre Company (LFC) can't proceed until they have the right permission and/or consents.
Please note, the Fibre installation process may take a few weeks or more.
Renting
- If you rent your home or business, you'll need your landlord's approval to install Fibre.
- The first appointment after you've ordered Fibre is the scope appointment. This is when the technician will discuss the method of installing Fibre and ask you to sign an Installation Agreement on behalf of your landlord. Your landlord may wish to be present for the scope before providing permission.
- It's important to get your landlord's approval before your scope appointment. Otherwise, your order might be delayed or cancelled.
- From 11 February 2021, an amendment to the Residential Tenancy Amendment Act means tenants can request Fibre to be installed and in the majority of cases the landlord must agree that it can be installed at no cost to them, except in the following circumstances:
- If installation would materially compromise the weathertightness or the character of any building; or
- If installation would compromise the structural integrity of any building; or
- If installation would breach an obligation or a restriction that is relevant to the premises (for example, an obligation or a restriction imposed by a bylaw, a planning or body corporate rule, or a covenant); or
- The landlord is to carry out extensive renovations that would be impeded by the Fibre installation. They must intend to take material steps towards the renovations within 90 days of receiving the Fibre request; or
- If the Tribunal, on application by the landlord, determines that, due to the circumstances of the premises or the installation, the landlord should not be required to provide for the installation of a Fibre connection in the premises
More details including information on the exceptions can be found at www.hud.govt.nz/RTA-reforms or www.tenancy.govt.nz
Important steps
- Contact your landlord before the scope appointment to explain you'd like to get Fibre installed.
- Read the Installation Agreement and End User Terms now. If you both read the terms before the appointment, you'll be more prepared to sign at the scope appointment.
- Your landlord's approval can be either verbal or in writing, such as an email or on paper. At the scope appointment the technician will ask you to sign an Installation Agreement on behalf of your landlord.
- Your landlord may choose to attend the scope appointment and give permission on the day. You'll need to let them know when your appointment is. You can both ask questions and agree on the plan together.
- If your landlord can't attend the scope, they could be available via phone.
The Local Fibre Company can't start the installation until they get permission from your landlord.
Why Fibre is ideal for homeowners
- Getting Fibre can increase the value of your property.
- It's desirable for tenants if you rent out your property.
- It's the way forward for consistent broadband speeds.
Down a right-of-way
Before the technicians can start working, the LFC will either need to notify or get permission from any neighbours who live down your driveway.
Addresses will be categorised into one of three categories, depending on what build work is required. Refer to the table below:
Category 1 - Low impact |
The work will have minimal lasting effect on the shared access way or right-of-way. Five days’ notice given to property owners. No objection can be made. |
Category 2 - Medium impact |
The work will have some physical impact on the shared access way or right-of-way. Property owners will be given at least 15 workings days’ notice before work begins. Objections and questions can be submitted via the Local Fibre Company (LFC) website. |
Category 3 - High impact |
The planned work will have a greater impact on the shared access way or right-of-way. For category 3 builds, consent is needed from affected property owners. |
Enable
- Addresses will be categorised into one of three categories, depending on what build work is required. Enable will either notify or gain consent from all affected landowners on your behalf.
- For more information on this, you can visit the Enable Website, www.enable.net.nz/property-access/
Chorus
- Addresses are categorised into one of three categories, depending on what build work is required. Chorus will either notify or gain consent from all affected landowners on your behalf.
- For more information on this, you can visit the Chorus website, www.chorus.co.nz/propertyaccess
Tuatahi First Fibre (TFF)
- Addresses are categorised into one of three categories, depending on what build work is required. TFF will either notify or gain consent from all affected landowners on your behalf.
- For more information on this, you can visit the TFF website, www.ultrafastfibre.co.nz
Northpower
- They’ll get permission on your behalf, but we can’t book any installation appointments until they do.
Unison
- They’ll get permission on your behalf, but we can’t book any installation appointments until they do.
In a multi-dwelling unit
If you’re in an apartment, the owner of the building has to give consent. Body corporates can give consent on behalf of others living there. If you’re in a multi-storey building, the owner of the building has to give consent.
You can let those affected know to look out for a consent form, which can speed up the process.
3. Read your installation agreement
At the end of the scope appointment, you'll sign one of these agreements. If you're a tenant, you need to ask the landlord for permission before you sign. Read the agreement before the scope appointment to be more prepared.
Chorus
If you live in Ashburton; Auckland including Pukekohe, Waiuku, Waiheke; Blenheim; Dunedin; Feilding; Gisborne; Greymouth; Invercargill; Kapiti including Paekakariki, Raumati, Paraparaumu, Waikanae; Levin; Masterton; Napier and Hastings; Nelson; Oamaru; Palmerston North; Queenstown; Rotorua; Taupo; Timaru; Wellington including Hutt City, Upper Hutt and Porirua or Whakatane:
Northpower
If you live in Whangarei:
Tuatahi First Fibre
If you live in Waikato, Tauranga, Taranaki or Whanganui:
Enable
If you live in Christchurch, Kaiapoi, Rangiora and Rolleston:
- Enable installation information
- Enable installation form
- Enable landlord approval form – This form lets Enable manage the conversation with the landlord if the tenant isn't comfortable to do this. It's not a mandatory form.
Unison
If you live in parts of Napier, Hastings, Taupo and Rotorua:
4. Track your Fibre order
Track your Fibre order online with the Spark order tracker. Track my Fibre order
If your Local Fibre Company is Chorus you can book appointments in the order tracker.
Unison, Enable, Northpower and Tuatahi First Fibre will book appointments on the phone.
5. Scope appointment
Your Local Fibre Company will arrange a technician to visit and look at where to put equipment. This is the scope appointment.Some houses are able to get a scope and installation in one appointment. You'll be informed if this is the case. Find out about a one day installation
The technician will look at:
- Where to install Fibre equipment, both inside and outside
- Whether anything could impact the installation. For example, cutting branches or digging driveways
- Any non-standard requirements that may incur an extra cost
Please note, in some cases where you need a non-standard installation, depending on what you've requested and your local fibre company you may receive a quote for extra costs without a scope appointment.
There are three pieces of equipment they'll install at your home:
- External Termination Point (ETP). It's a small box installed on an outside wall. This connects back up to the Fibre network in the road.
- Optical Network Terminal (ONT) or Fibre box. The ONT is another small box, attached to a wall inside your house. It connects to the ETP. It's where you'll plug in the new modem. The ONT should be near at least two power points or a power board. You need to decide if you'll keep existing phone wiring and whether you need it near a TV or computer. The technician will discuss this with you.
- A Fibre WiFi modem. Spark will courier the modem to you before the installation. You can give it to the technician at the install appointment.
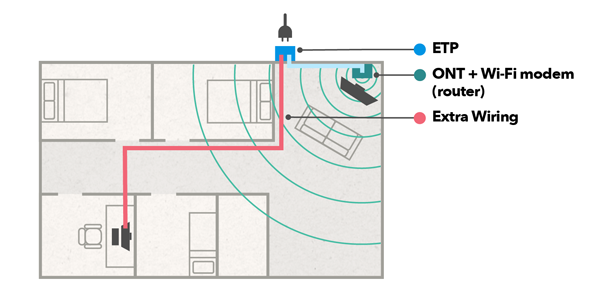
A typical layout shows the ONT and router by the TV and extra wiring to a home office.
Points you can discuss with the technician
- If you have a medical or security alarms please tell your technician that you've confirmed with your alarm provider that they're compatible with Fibre
- What your landline wiring options are
- Look at where your current modem is and let the technician know if you have any existing WiFi issues
- Ask how the Fibre cable will get to your house
- Tell them your 'no-go' areas. You have the right to suggest a different option for cabling if you prefer
6. Build: Get Fibre cables laid outside
Once the plan is agreed, the technician will connect the Fibre cable from the street to your land.
You don't need to be home for this. The contractor may call you if something from the plan needs to change.
The External Termination Point (ETP) is the first piece of equipment to be installed.
The staff will do their best to minimise impact on grassed areas. If hard surfaces are affected, they'll be resealed.
The build time and installation appointment should happen within 1-2 weeks after the scope appointment.
7. Set up your Fibre box and modem
If you already have a Fibre box (ONT)
There's no need for a technician visit if you already have Fibre installed. If you need a landline, you can follow the Fibre landline set up steps
Otherwise, you can connect your modem to the Fibre box yourself with these steps:
- Locate the Fibre box in your house. It will often be on a wall. If you can't find it, you can go outside to find the external box. Once you find that, the Fibre box should be in a corresponding place on the inside. It should look like the images below.
- Check that it's plugged in to the wall.
- Check the power and optical/PON lights are green and lit up.
- Once your modem is delivered you can connect it to your Fibre box. To do this connect the Ethernet cable from the blue WAN port on the back of your modem into the Fibre box. Only one port on the Fibre box will provide service. In most cases this is GE1 or LAN1, but could be other ports. Also, ensure that the ethernet cable that you are using is Cat 5e or above. Most ethernet cables have the category printed along the cable.
Missing ONT power cable
If you notice that the power cable for your Fibre Box or ONT is missing or damaged, you can request a replacement cable based on your local fibre company:
- If your Local Fibre Company is: Chorus, Go to Chorus - Power cord replacement for ONT
- If your Local Fibre Company is Tuatahi First Fibre (TFF), Go to TFF ONT Form
- If your Local Fibre Company is Enable, contact Enable on 0800 4 FIBRE (0800 4 34273)
- Any other Local Fibre Company, get in touch with Spark
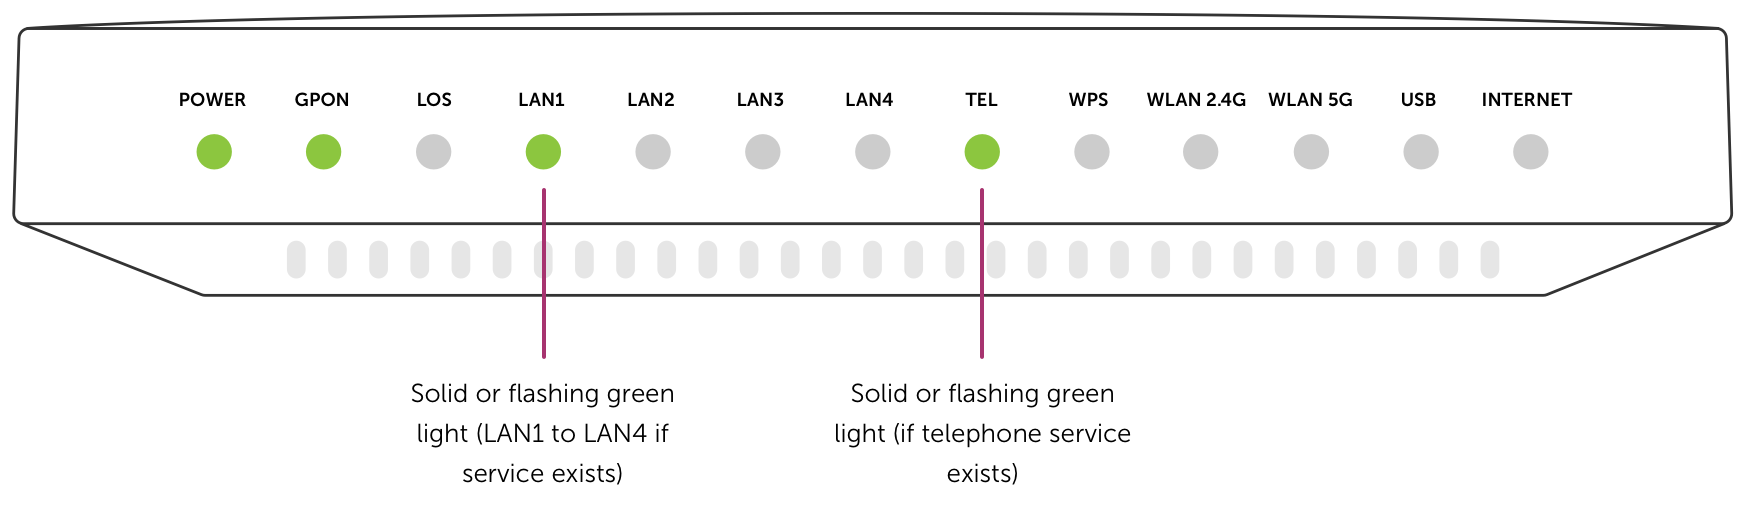
Fibre box lights - Chorus
Chorus - model type 100 and 200
Check the power and optical lights are green, and the correct LAN light is orange.
- If the power light is off, ensure that the Fibre box is plugged in to a power point and switched on. If the power cable is missing, you may need to order a replacement cable from your Local Fibre Company.
- If the optical light is red, you will need to contact Spark as there may be an issue with the Fibre box.
- If your modem is connected to a LAN port on the ONT and you don't see the LAN light lit up in green or orange, you may not be connected to the provisioned LAN port on the ONT. Try connecting to another spare LAN port until the respective LAN light turns on.
- If you find the LAN light is green it means the Fibre box or modem are connected at a lower speed. It's best to try a different cable.
Chorus - model type 300

- If the power light is off, ensure that the Fibre box is plugged in to a power point and turned on. If the power cable is missing, you may need to order a replacement cable from your Local Fibre Company.
- If the LOS light is red, you will need to contact Spark as there may be an issue with the Fibre box.
- If your modem is connected to a LAN Port on the ONT and you don't see the LAN light lit up in green, you may not be connected to the provisioned LAN port on the ONT. Try connecting to another spare LAN port until the respective LAN light turns on.
More information on the Chorus fibre box can be found on the Chorus website: My Optical Network Terminal (ONT)
Fibre box lights - other Local Fibre Company
The power light should be green. If the power light is off, ensure that the Fibre box is plugged in to a power point and switched on. If the power cable is missing, you may need to order a replacement cable from your Local Fibre Company.
- The PON Light should be green. If the LOS light is red, you will need to contact Spark as there may be an issue with the Fibre box.
- The appropriate LAN light should be lit up based on the LAN port that was provisioned for your connection.
Message us if:
- you can’t get the power light to turn on on
- the optical light is not green
- the LOS light is on
If any of these happen, there may be an issue with the Fibre box, or the Fibre cable to your address.
Modem set up
After the Fibre box is powered on and showing the correct lights you’ll need to check what the lights on your modem are doing. Follow these instructions to set up your modem
8. Install appointment
Once the outside work is done, the technician will install Fibre inside. You will need to be home for this appointment and it takes between four and six hours. Please be home for the whole day.
If you have a One Day Installation you will also sign your installation agreement at this appointment. Find out more about One Day Installations below.
- The Fibre box, also known as the Optical Network Terminal (ONT), will be placed inside. This is owned by the Local Fibre Company and is connected to this house. If you move house please leave it behind.
- If you need the existing phone jacks to work with Fibre, you'll need to request integrated wiring
- Once you've requested integrated wiring, a second box will be placed next to the Fibre box. Your internal wiring will be connected to the new Fibre line.
- The modem will connect to the Fibre box and turn on. Then the technician will do a speed test.
- Your Fibre is now ready to go.
One day installation
Some houses are able to get a scope and installation in one appointment. You'll be informed if this is the case. This means you'll only need to stay home once to get connected.
If so, please be at home for the whole day. It will take approximately four - six hours. Here's what you can expect:
- Scope: The first part of the appointment is a scope, also known as the Agree step. This is where you'll both discuss the installation and agree on a plan. You'll need to sign the agreement before work can begin.
- Install: The second part of the appointment is where the technician will install Fibre. Check out the installation process
- Connect: The technician will connect your Fibre and you're good to go.
What you need to do before the appointment
- Make plans to stay home for the whole day
- Make sure someone is at home who can make decisions about the property
- Get permission from your landlord if you're renting
- Have a look at the different installation methods
- Think of a central point in the house for your modem. You can suggest this to the technician.
In rare situations, if the technician can't complete the installation on the same day, they can connect everything up inside while you're home. Then, when they come back to do the outside build work you won't need to be home.
If the installation is more complex than anticipated the technician may need to meet you at home a second time.
9. Check your alarms
If you have monitored security or medical alarms, check they still work with your new Fibre connection. You can contact your security or medical alarm installer to do so.
Still need help?
If you have an issue that isn't solved with these steps, please message our team. Message us