Please configure
Spark Futura Modem support
Learn how to set up and troubleshoot your Spark Futura Modem.
Modem information
Technical specifications
FEATURES
- Quad-Stream AX3500 WiFi – up to 6000Mbps (1147 + 4800 Mbps)
- Next generation Wave 2 WiFi
- Multi-User MIMO technology in 5GHz for more throughput with simultaneously streamed data for multiple devices
- ARM 2GHz 4-core processor plus additional offload engines and dedicated routing accelerator
- Beamforming+ for more reliable connections in 2.4GHz and 5GHz
- Gigabit internet capable over ethernet
SUPPORTED CONNECTION TYPES
- 4G
- Fibre
WIFI SPEED
- 802.11n: up to 600Mbps
- 802.11ac: up to 1733Mbps
- 802.11ac (1024QAM): up to 2400Mbps
- 802.11ax 2.4Ghz: up to 1200Mbps
- 802.11ax 5GHz: up to 2400Mbps
WIFI TECHNOLOGY
- OFDMA
- Beamforming
- MU-MIMO
- 1024-QAM high data rate
- 20/40/80/160 MHz bandwidth
WIFI BAND
Simultaneous dual band WiFi - 4x4 2.4Ghz + 4x4 5GHz
WIFI STANDARDS
- IEEE® 802.11 b/g/n/ax 2.4GHz
- IEEE® 802.11 a/n/ac/ax 5GHz
BEAMFORMING
Beamforming+
- Implicit and Explicit Beamforming for 2.4GHz and 5GHz bands boosts speed, reliability and range of WiFi connections
LTE SUPPORT
- LTE Category 12, capable of up to 600Mbps DL, 150Mbps UL
- 4G LTE bands: 1, 3, 5, 7, 28, 40, 41
PORTS
- 5x 10/100/1000Mbps Gigabit Ethernet ports (1 WAN, 4 LAN)
- 1x FXS (Phone)
- 1x USB 2.0
MEMORY
- 1GB DDR4
- 4GB eMMC Flash
SECURITY
- DMZ
- Stateful Packet Inspection Firewall
- WiFi Protected Access® (WPA2, WPA3, AES and TKIP)
- Intrusion Detection and Prevention (DoS, SYN Flood, Ping of Death, Fraggle, LAND, Teardrop, etc.)
- Customisable Firewall Security Levels
PHYSICAL SPECIFICATIONS
- Dimensions: 208mm x 208mm x 85mm
- Weight: 875g (device), 1460g (full package)
Installation
How to set up your modem
Learn how you can set up and connect your modem on a Fibre or Wireless connection. The Spark Futura Modem package contains:
- Spark Futura Modem
- Power supply
- One blue cable
- One yellow cable
- One grey cable
- Safety guide
How to set up your modem on Wireless Broadband
- Plug your modem into a power supply.
- Wait while the modem connects to the network. This can take up to five minutes.
- Check the colour of the 4G LTE LED indicator on the front of the modem. For the best performance, the light should be green.
- If the LED indicator isn't green, move your modem closer to the window for a better signal.
How to set up your modem on Fibre Broadband
- Plug your modem into a power supply near your Fibre box. The Fibre box is also known as an Optical Network Terminal (ONT). It can usually be found on a wall inside your home.
- Turn on your modem by pressing the Power button and wait for the lights to turn on.
- Plug one end of the blue ethernet cable into the port labelled WAN or Fibre on your modem.
- Plug the other end of the blue ethernet cable into the port on the Fibre box labelled LAN1 or GE1. If there's already something plugged in there, try LAN2 or GE2 instead.
- The light next to the port name will come on. If it doesn't, try plugging the ethernet cable into the next port until the light comes on.
How to connect your landline phone
Learn how to connect your landline phone to your Spark Futura Modem on a Fibre or Wireless connection.
Connect your landline phone on Wireless
- Plug your phone into a power supply.
- Plug one end of the supplied grey phone cable into your phone.
- Plug the other end into the modem's phone port.
Connect your landline phone on Fibre
There are two ways you can connect your landline on a Fibre connection. Instructions have been provided below for both methods.
If you have integrated wiring:
- Find an empty phone socket within your house and plug your phone into it.
If you don't have integrated wiring:
- Plug one end of the supplied grey phone cable into your phone.
- Plug the other end into the port on the Fibre box labelled POTS1, TEL or TEL1.
How to check if you have integrated wiring
- On your Fibre box (also known as as the Optical Network Terminal or ONT), check if there is a cable already plugged into the phone port. The port will be labelled POTS1, TEL or TEL1.
- If the cable is connected to a phone socket or another device, this means that integrated wiring has been installed.
How to check your modem lights
Learn what the different colours and states of the LED lights on your modem mean.
There are four LED lights on the Spark Futura Modem: WiFi, 4G LTE, Internet and Phone. These lights may flash and/or change colour depending on what's happening.
WiFi light
| Light status | Description | |
 |
No light | WiFi is off (or LED lights have been turned off) |
 |
Solid green | WiFi is on |
 |
Slow flashing green | WPS connection in progress |
|
Flashing green | WPS connection failed or timed out |
4G LTE light
| Light status | Description | |
|
No light | Modem is powered off (or LED lights have been turned off) |
|
Solid green | 4G data is working |
 |
Solid yellow | 4G signal strength is weak |
 |
Flashing yellow | Invalid SIM has been inserted |
 |
Flashing red | 4G data is not working |
Internet light
| Light status | Description | |
|
No light | Modem is powered off (or LED lights have been turned off) |
|
Solid green | Connected to the internet |
 |
Solid red | Not connected to the internet |
Phone light
| Light status | Description | |
|
No light | Modem is powered off (or LED lights have been turned off) |
|
Solid green | Landline is working |
|
Solid red | Landline is not working |
How to connect your devices to WiFi or ethernet
Learn how to connect your devices to your Futura Modem by WiFi or an Ethernet cable.
Find your WiFi password
To ensure the protection of your WiFi network, your modem comes with a pre-configured password. Only devices that have connected using this password will have access to your WiFi network.
You can find the default password on the back of your modem.
If you later change your WiFi password and forget what it is, you can factory reset your modem to restore it to the default WiFi password.
Connect your devices to WiFi
- Open your device's WiFi menu.
- Look for and select your WiFi network name.
- Enter the WiFi password to connect.
You're now connected to your WiFi network. We recommend going to one of your favourite website to check it's working.
Connect your devices using an ethernet cable
To give you the best speed, we recommend using the yellow ethernet cable included with your Futura Modem. If you're using your own ethernet cable, check that it's CAT5e or above.
- Connect one end of the ethernet cable to the modem's ethernet port.
- Connect the other end of the cable to your device.
Manage
How to log in to your modem
Learn how to access the modem interface for your Smart Modem 2.
- Open any web browser such as Chrome, Firefox, Edge.
- In the address bar, type 192.168.1.254 and press enter.
- Enter your modem login information. By default, the User name and Password will both be admin. This information is also located on the back of your modem.
- You'll be prompted to change your Admin username and password when you log in for the first time.
The modem management page will now appear. You can make changes to the modem settings including the WiFi name, WiFi password or modem password.
How to reset your modem to factory settings
Learn how to restore your Spark Futura Modem back to its factory default settings.
Factory reset using the reset button
Follow these steps to factory reset your Spark Futura modem. Please note that by factory resetting your modem, any changes you've made to the modem settings will be restored back to default. This includes your WiFi network name and password.
- Make sure your modem is powered or switched on.
- Insert a paper clip or pin into the reset hole on the back of the modem.
- Push in the paper clip or pin for 10 to 15 seconds and then take it out.
- After a few seconds the LED lights will turn off and modem will begin rebooting.
- The power light will start flashing green to indicate that the factory reset is in progress.
- When all the LED lights are green again, the modem has been fully reset.
Factory reset using the modem interface
Make sure that you're already connected to the modem by an ethernet cable plugged into a laptop or PC (recommended option), or by WiFi.
- Open any web browser such as Chrome, Firefox, Edge or Safari
- In the address bar, type 192.168.1.254 and press enter.
- Enter your modem login information.
- By default, the User name and Password will both be admin.
- The login information is also located on the back of your modem.
- By default, the User name and Password will both be admin.
- Select Adminstration from the left hand side.
- Select Restore/Save/Upload Setting.
- Select Restore to Factory Defaults
- Select OK and then OK again to confirm the factory restart of your modem.
All the settings and configurations on your modem will reset to default and your modem will automatically reboot.
How to set up guest WiFi
Learn how to set up a guest WiFi network on your Spark Futura Modem. Guest WiFi networks are a great way to offer your house guests easy access to the internet without also giving them access to your LAN, computers, printers and other WiFi connected devices.
- Open any web browser such as Chrome, Firefox, Edge.
- In the address bar, type 192.168.1.254 and press enter.
- Enter your modem login information and click Login. By default, the User name and Password will both be admin. This information is also located on the back of your modem.
- Click WLAN from the left hand side.
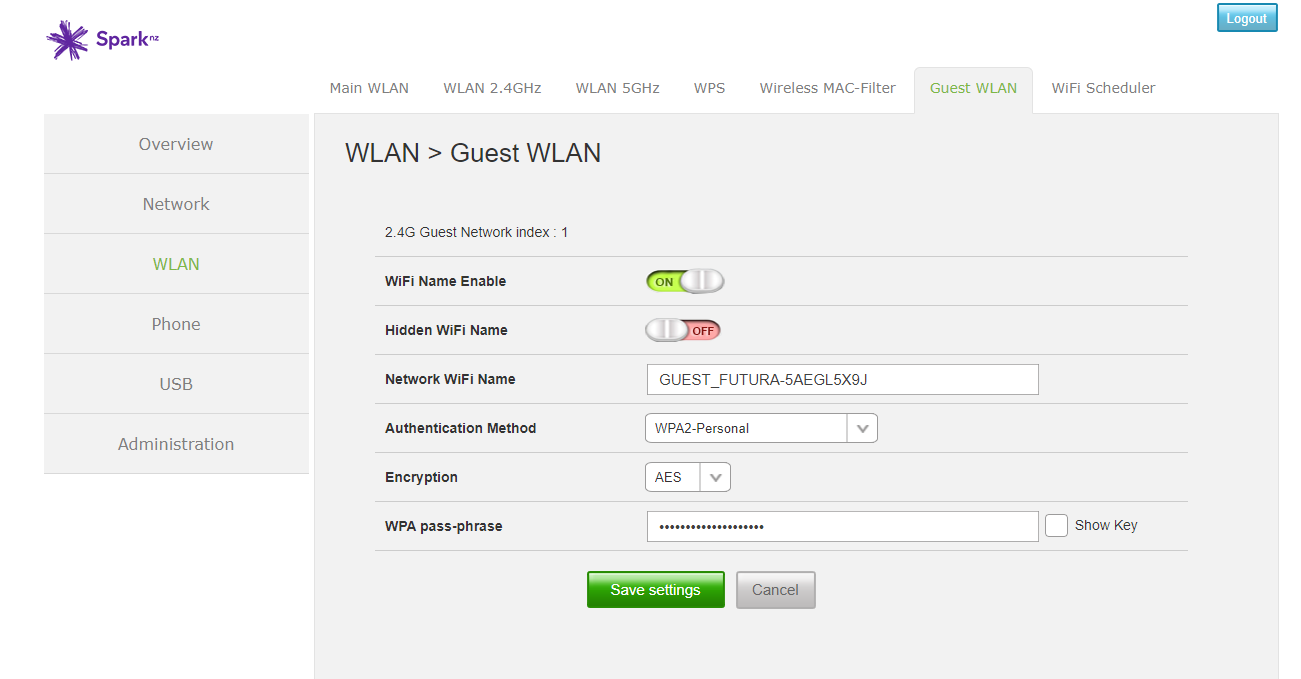
- Click Guest WLAN from the menu bar on the top.
- Under Wireless 2.4GHz, click Edit, if you wish to enable guest access on the 2.4 GHz frequency.
- Click the slider, to enable WiFi Name Enable
- Enter your WiFi network name in the Network Name (SSID) field, the select an Authentication Method from the dropdown menu.
- Enter a password (if you wish to have one) on the WPA pass-phrase field.
- Click Save Settings.
- Repeat steps 6 to 10 for the for Wireless 5GHz, if you wish to also enable guest access on the 5GHz frequency.
You have successfully set up a guest WiFi network on your Spark Modem.
Settings
How to change your WiFi name (SSID) and password
Learn how to change your WiFi network name and password on the Spark Futura Modem.
- Open any web browser such as Chrome, Firefox, Edge.
- In the address bar, type 192.168.1.254 and press enter.
- Enter your modem login information. By default, the User name and Password will both be admin. This information is also located on the back of your modem.
- Click WLAN from the left hand side.
- In the WiFi Name field, enter your new WiFi network name and in the WiFi Password field, enter your new WiFi network password. Ensure your password is at least 8 characters.
- Click Save Settings.
Your WiFi network name and password are now updated. Please note that you will need to connect using these new details, on all devices that have previously connected to your WiFi network.
How to change your WiFi channel
Learn how to update your WiFi channel and why you may do this.
Locate the best WiFi channel for you
Changing channels can often reduce WiFi interference. This can be especially useful if you live in an apartment with a lot of WiFi networks nearby. To get an idea of which channels are already in use in your home or nearby, try the following mobile apps:
How to change your WiFi channel
- Open any web browser such as Chrome, Firefox, Edge.
- In the address bar, type 192.168.1.254 and press enter.
- Enter your modem login information. By default, the User name and Password will both be admin. This information is also located on the bottom of your modem.
- Click WLAN from the left-hand side.
- Click WLAN 2.4GHz tab from the menu bar.
- Update the WiFi channel in the Channel field by selecting a new channel from the dropdown menu.
- Click Save Settings.
- To adjust the 5GHz WiFi network channel, repeat steps 5 to 7 for WLAN 5GHz tab.
Your WiFi channel is now updated. We recommend trying it out for at least two hours before changing WiFi channels again.
How to enable WiFi Protected Setup (WPS)
Learn how to enable the WPS (WiFi Protected Setup) functionality on your Spark Futura Modem. WPS allows you to easily connect your wireless devices (computer, laptop, mobile phone etc.) to your modem without having to enter the WiFi password.
- Open any web browser such as Chrome, Firefox, Edge
- In the address bar, type 192.168.1.254 and press enter
- Enter your modem login information. By default, the User name and Password will both be admin. This information is also located on the back of your modem.
- Click WLAN from the left hand side
- Click WPS from the menu bar
- Check Enable WLAN 2.4GHz and WLAN 5GHz
- Click Save settings
- Click Start PBC. The WPS will now be enabled.
- On your mobile device, go to your WiFi settings and choose WPS PIN Entry (it's possible that it might be listed under a similar name). Your mobile device will connect via WPS to your Spark Futura Modem.
Apples devices do not allow WPS connections to be made.
WPS has now been enabled on your modem and your mobile device is successfully connected via WPS to your modem.