Please configure
Spark Smart Modem 3 support
Modem information
Technical specifications
Features
Quad-Stream AX3500 WiFi – up to 5.66 Gbps (860.3+ 4803.9 Mbps) *
WiFi6 11ax
Downlink and Uplink Multi-User MIMO technology in both 2.4GHz and 5GHz
1024QAM modulation for higher throughput
2 Ghz dual-core processor
Support DDR4 faster than DDR3
5-core packet acceleration for CPU offload
2GHz ARM dual core for more computing power
Gigabit internet capable over ethernet **
DSL technology
Comply with ITU-T G.993.2 – Annex A with 998 asymmetric band plan and vectoring (profile 8x,12x,17a,30a)
Comply with ITU-T G.992.1 (G.dmt), ITU-T G.992.3 (ADSL2), ITU-T G.992.5 ADSL2+ standard
WiFi technology
802.11n: up to 450Mbps
802.11ac: up to 3466.7 Mbps
WiFi 4 256QAM (2.4GHz): up to 600Mbps
WiFi 4 1024QAM (2.4GHz): up to 750Mbps
WiFi 5 1024QAM (5GHz) : up to 4333Mbps
WiFi 6 1024 QAM(2.4Ghz) up to 860.3 Mbps
WIFI 6 1024 QAM(5 Ghz) up to 4803.9 Mbps
Data rate
(860.3+ 4803.9 Mbps)
WiFi band
Simultaneous dual band 2.4 & 5GHz
WiFi standards
IEEE® 802.11 b/g/n/ax 2.4GHz
IEEE® 802.11 a/n/ac/ax 5GHz
Beamforming
Beamforming+ — Boosts speed, reliability and range of WiFi connections in 5GHz
Memory
RAM DDR4 1GB
Internal Storage eMMC 8GB
Security
DMZ
Stateful Packet Inspection Firewall
WiFi Protected Access® (WPA3, WPA2, AES and TKIP)
Intrusion Detection and Prevention (DoS, SYN Flood, Ping of Death, Fraggle, etc.)
Customizable Firewall Security Levels
Physical specifications
Dimensions: 265 x 170 x 85mm (with stand)
Weight: 536g (device)
Number of ethernet ports
1 x 2.5GB WAN port
3 x gigabit ethernet LAN port
Number of USB ports
1 x USB 2.0 port
* Maximum wireless signal rate derived from IEEE 802.11 specifications. Actual data throughput and wireless coverage will vary and may be lowered by network and environmental conditions, including network traffic volume and building construction. Spark makes no representations or warranties about this product’s compatibility with future standards.
** Gigabit Internet speeds require a compatible broadband plan and device.
Installation
How to set up your modem
Learn how to set up and connect your modem.
You'll find a quick start guide printed on the inside of your modem's box lid. Inside the box you'll find:
- Spark Smart Modem 3
- Power supply unit
- Blue Fibre ethernet cable
- Yellow LAN ethernet cable
- Black VDSL cable
- Grey ADSL cable
- Safety information
Set up your modem on fibre broadband
- Plug your modem into a power supply near your Fibre box. The Fibre box is also known as an Optical Network Terminal (ONT). It can usually be found on your internal wall.
- Turn on your modem by pressing the Power button and wait for the lights to turn on.
- Plug one end of the blue ethernet cable into the port labelled Fibre on your modem.
- Plug the other end of the blue ethernet cable into the port on the Fibre box labelled LAN1 or GE1. If there's already something plugged in there, try LAN2 or GE2 instead.
- The light next to the port name will come on. If it doesn't, try plugging the ethernet cable into the next port until the light comes on.
Set up your modem on VDSL broadband
For your VDSL connection, a technician will first install a VDSL splitter and a VDSL jackpoint (RJ45).
- Plug your modem into a power supply near your VDSL jackpoint.
- Turn on your modem by pressing the Power button and wait 30 seconds for the lights to turn on.
- Plug one end of the black VDSL cable to the port labelled DSL on your modem.
- Plug the other end of the black VDSL cable into your VDSL jackpoint..
Set up your modem on ADSL broadband
You will need to have an ADSL filter on every phone socket in use, including phone lines, faxes or anything else that gets plugged into a phone socket. Filters remove interference on your phone line and improve your broadband service, even if you don’t have a home phone plugged in.
- Plug your modem into a power supply near your jackpoint.
- Turn on your modem by pressing the Power button and wait 30 seconds for the lights to turn on.
- Plug one end of the grey ADSL cable to the port labelled DSL on your modem.
- Plug the other end of the grey ADSL cable into the ADSL port of your ADSL filter.
- Plug your filter into a jackpoint in your home.
How to connect your landline
Learn how to connect your landline phone on a Fibre connection.
There are two ways you can connect your landline on a Fibre connection. Instructions have been provided below for both methods.
If you have integrated wiring
- Find an empty phone socket within your house and plug your phone into it.
If you don't have integrated wiring
- Plug one end of the supplied grey phone cable into your phone.
- Plug the other end into the port on the Fibre box labelled POTS1, TEL or TEL1.
- The light next to the port name will come on. If it doesn't and your Fibre box has a second phone port named POTS2 or TEL2, plug your cable into that port instead.
How to check if you have integrated wiring
- On your Fibre box (also known as as the Optical Network Terminal or ONT), check if there is a cable already plugged into the phone port.
- The port will be labelled POTS1, TEL, TEL1, POTS2 or TEL2.
- If the cable is connected to a phone socket or another device, this means that integrated wiring has been installed.
How to connect your devices to WiFi or ethernet
Learn how to connect your devices to your Smart Modem 3 by WiFi or an Ethernet cable.
Find your WiFi password
To ensure the protection of your WiFi network, your modem comes with a pre-configured password. Only devices that have connected using this password will have access to your WiFi network.
You can find the default password on the back of your modem.
If you later change your WiFi password and forget what it is, you can factory reset your modem to restore it to the default WiFi password.
Connect your devices to WiFi
- Open your device's WiFi menu.
- Look for and select your WiFi network name.
- Enter the WiFi password to connect.
You're now connected to your WiFi network. We recommend going to one of your favourite websites to check it's working.
Connect your devices using an ethernet cable
To give you the best speed, we recommend using the yellow ethernet cable included with your Smart Modem 2. If you're using your own ethernet cable, check that it's CAT5e or above.
- Connect one end of the ethernet cable to the modem's ethernet port.
- Connect the other end of the cable to your device.
How to check your modem lights
Confirm your Smart Modem 3 has been set up correctly by looking at the LED lights.
Manage
How to log in to your modem
Learn how to access the modem interface for your Smart Modem 3 so you can change its settings.
- Open any web browser such as Chrome, Firefox, Edge.
- In the address bar, type 192.168.1.254 and press enter.
- Enter your modem login information. By default, the User name and Password will both be admin.
This information is also located on the back of your modem. It's underneath the sticker that has your WiFi name and password on it. Slide the sticker across to see it.
The modem management page will now appear. You can make changes to the modem settings including the WiFi name, WiFi password or modem password.
How to reset your modem to factory settings
Learn how to restore your modem back to its factory default state. This returns your modem to its out-of-the-box settings. In many cases, a reset may fix connection issues and problems.
Factory reset using reset button
Follow these steps to factory reset your Spark Smart Modem 3. Please note that by factory resetting your modem, any changes you've made to the modem settings will be restored back to default. This includes your WiFi name and password.
- Power on your modem. Place a paper clip or pin into the hole on the back of the modem labelled RESET.
- Hold the paper clip or pin down for 10 to 15 seconds and release.
- The modem will reboot on its own. Once the WLAN light stops flashing, the reset process is complete.
Please note that factory resetting your modem does not reset the modem firmware to an earlier version. It will only change all settings back to factory default.
Factory reset using modem interface
- Open any web browser such as Chrome, Firefox, Edge.
- In the address bar, type 192.168.1.254 and press enter.
- Enter your modem login information. By default, the User name and Password will both be admin. This information is also located on the back of your modem, underneath the sticker with your WiFi details on it.
- Select Administration on the left hand side menu.
- Select Restore/Save/Upload Setting.
- Select the Restore to Factory Defaults button.

- Select OK then OK again to confirm the factory reset.
All data and settings saved on your modem will be reset to their defaults. Your modem will automatically reboot.
How to set up guest WiFi
Learn how to set up a guest WiFi network on your Spark Smart Modem 3. Guest Wi-Fi networks are a great way to offer your house guests easy access to the internet without also giving them access to the rest of your network and WiFi connected devices.
- Open any web browser such as Chrome, Firefox, Edge.
- In the address bar, type 192.168.1.254 and press enter.
- Enter your modem login information and click Login. By default, the User name and Password will both be admin. This information is also located on the back of your modem. It's underneath the sticker with your WiFi details on it.
- Select WLAN from the left hand side menu.
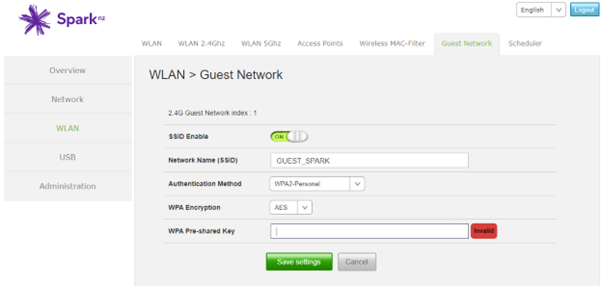
- Select Guest Network from the menu bar on the top.
- Under Wireless 2.4GHz, select Edit if you wish to enable guest access on the 2.4 GHz frequency.
- Select the slider to enable SSID Enable.
- Enter your WiFi network name in the Network Name (SSID) field, and password (if you wish to have one) in the WPA Pre-shared Key field.
- Select Save Settings.
- Repeat steps 6 to 9 for Wireless 5GHz, if you wish to also enable guest access on the 5 GHz band.
Settings
How to change your WiFi name (SSID) and password
Learn how to change your WiFi network name and password on the Spark Smart Modem 3.
- Open any web browser such as Chrome, Firefox, Edge.
- In the address bar, type 192.168.1.254 and press enter.
- Enter your modem login information. By default, the User name and Password will both be admin. This information is also located on the back of your modem. It's underneath the sticker with your WiFi details on it.
- Select WLAN from the left hand side menu.
- In the SSID field, enter your new WiFi network name. In the WPA Pre-shared Key, enter your new WiFi network password. Ensure your password is at least 8 characters.
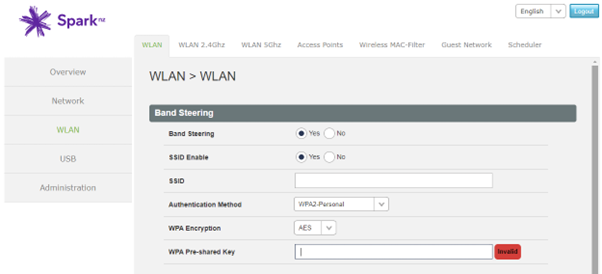
- Select Save Settings.
Your WiFi network name and password are now updated. You'll need to connect all devices that have previously connected to your WiFi network using these new details.
How to change your WiFi channel
Learn how to update your WiFi channel and why you may do this.
Locate the best WiFi channel for you
Changing channels can often reduce WiFi interference. This can be especially useful if you live in an apartment with a lot of WiFi networks nearby. To get an idea of which channels are already in use in your home or nearby, try the following mobile apps:
- InSSIDer
- WiFi Analyser free from FarProc
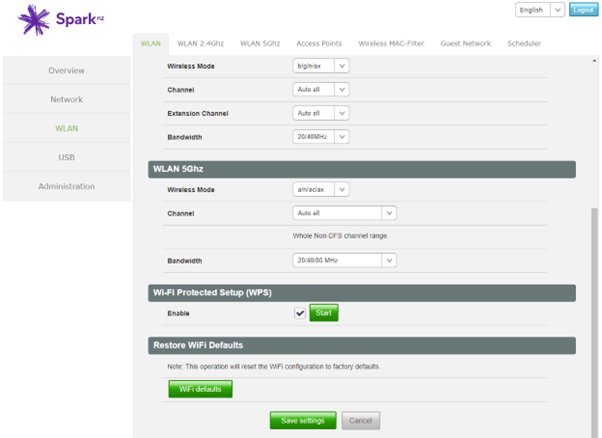
How to change your WiFi channel
- Open any web browser such as Chrome, Firefox, Edge.
- In the address bar, type 192.168.1.254 and press enter.
- Enter your modem login information. By default, the User name and Password will both be admin. This information is also located on the back of your modem. It's underneath the sticker with your WiFi details on it.
- Select WLAN from the left hand side menu.
- Update the WiFi channel in the Channel field by selecting a new channel from the dropdown menu. To adjust the 5GHz WiFi network channel, update the Channel field under WLAN 5GHz.
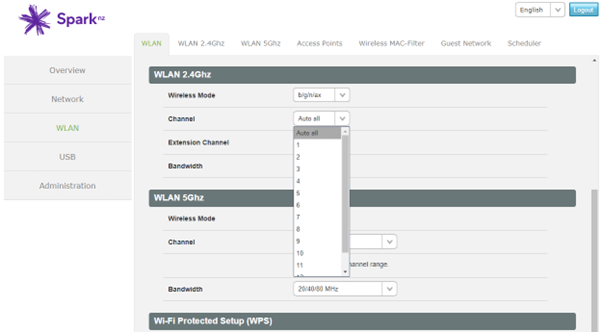
- Select Save Settings.
Your WiFi channel is now updated. We recommend testing for at least two hours before changing WiFi channels again.
How to enable WiFi Protected Setup (WPS)
Learn how to enable the WPS (WiFi Protected Setup) functionality on your Spark Smart Modem 3. WPS allows you to connect your devices to your modem without having to enter the WiFi password.
- Open any web browser such as Chrome, Firefox, Edge.
- In the address bar, type 192.168.1.254 and press enter.
- Enter your modem login information. By default, the User name and Password will both be admin. This information is also located on the back of your modem. It's underneath the sticker that has your WiFi details on it.
- Select WLAN from the left hand side menu.
- Under Wi-Fi Protected Setup, check Enable.
- Select Start. WPS will now be enabled.
If you wish to connect your mobile device to your WiFi, go to the WiFi settings on your device and select WPS PIN Entry. It may have a different but similar name. Your mobile device will connect via WPS to your Smart Modem 3.
How to disable your modem's WiFi
Learn how to turn off the WiFi on your modem.
- Open any web browser such as Chrome, Firefox, Edge.
- In the address bar, type 192.168.1.254 and press enter.
- Enter your modem login information. By default, the Username and Password will both be admin. This information is also located on the back of your modem. It's underneath the sticker that has your WiFi details on it.
- Select WLAN from the menu on the left hand side.
- Under SSID Enable, select No.
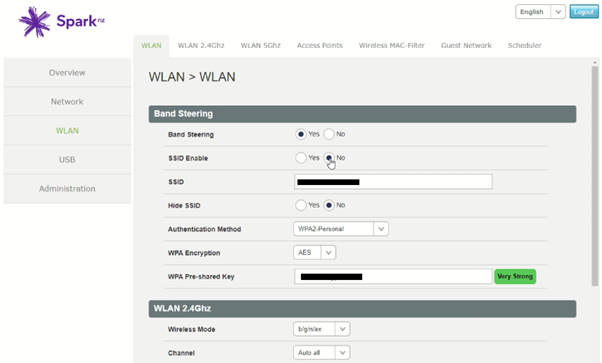
- Select Save Settings.
WiFi on your modem has now been disabled. To connect to the internet you will need to do one of the following:
- Connect your device to your modem using an ethernet cable
- Connect your device to a mesh WiFi network, where one of the mesh units is connected to your modem by an ethernet cable.