Please configure
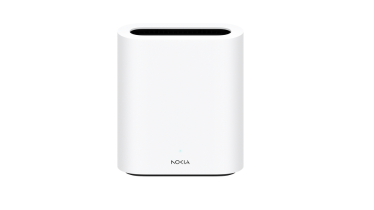
Nokia FastMile 5G Gateway 7 support
Learn how to set up and troubleshoot your Nokia FastMile 5G Gateway 7.
Modem information
Technical specifications
Benefits
- High speed Wireless Broadband: Equipped with an advanced 5G RF Chipset and Category 19 4G, the Nokia FastMile 5G Gateway 7 delivers exceptional Wireless Broadband speeds.
- Enhanced 5G Coverage: The device extends 5G speeds throughout the home with the latest Wi-Fi 7 technology, ensuring seamless connectivity.
- User-friendly installation: The Nokia WiFi app provides guided self-installation, optimising signal strength for the best performance.
- Parental control features: Family Profiles offer robust parental controls, including scheduled bedtimes and URL blocking, to help create a safer online environment.
- Eco-friendly design: The modem features a green design with no plastic in its packaging, promoting sustainability.
Supported connection types
- 5G Wireless Broadband
- 4G Wireless Broadband
- Fibre Broadband
WiFi Technology
- Dual band simultaneous operation (WFi 7):
- 2.4GHz: 802.11 a/b/g/n/ac/ax/be, 4x4 with MU-MIMO, RF bandwidth 20/40 MHz
- 5GHz: 802.11 a/b/g/n/ac/ax/be, 4x4 with MU-MIMO, RF bandwidth 20/40/80/160 MHz
- UL/DL MU-MIMO over oFDMA
- MU-OFDMA and 4K QAM
- The device supports up to 128 clients
- Band steering and seamless roaming (IEEE 802.11k and 802.11v)
- Intelligent channel selection optimisation
- Support for explicit beamforming
- Support for Nokia WiFi EasyMesh
- Self-optimising network
- Mesh topology interoperable with Nokia WiFi
Cellular support
- 5G NSA/SA
- 3GPP Rel17, FR1 Band: N1, N5, n40, n41, n78
- LTE Support
- Cat 19 3CA, B1, 3, 5, 7, 8, 28, 40, 41
Security
- Security support against common security threats for networking equipment and DOS attacks
- ACL and firewall are built-in and auto-enabled
- WPA support including WPA-PSK (TKIP, AES) and WPA3
Ports
- 3x Gigabit Ethernet ports (1 WAN/LAN + 2 LAN)
- USB 3.1 Type-C
Physical specifications
- Dimensions: 199 x 70 x 65mm
- Weight: 1kg
Installation
How to set up your modem
Learn how you can set up and connect your modem on a Wireless or Fibre Broadband connection.
The Nokia FastMile 5G Gateway 7 box contains:
- Nokia FastMile 5G Gateway 7
- Power Supply
- Quick Start guide
- Safety cards
- Blue ethernet cable
- Yellow ethernet cable
Set up your modem on Wireless Broadband
Your new modem comes with the SIM pre-inserted so it’s ready to set up.
- Find your nearest 5G cell tower using the map at spark.co.nz/max-wireless
- Download the Nokia WiFi app from the Play Store or App Store for help with positioning your modem.
- Find a spot for your modem up off the ground, near a window facing your nearest cell tower.
- Plug the black power cable into the modem and into a power supply.
- Switch your modem on and wait for the light on the front to turn green. This can take up to 5 minutes.
Note: If the light is orange or red, use the Nokia WiFi app to re-position your modem for a stronger signal.
Set up your modem on Fibre Broadband
- Plug the black power cable into your modem and into a power supply near your Fibre box. The Fibre box is also known as an Optical Network Terminal (ONT) and can usually be found on your internal wall.
- Plug one end of the blue ethernet cable into the port labelled WAN on your modem.
- Plug the other end of the blue ethernet cable into the port on the Fibre box labelled LAN1 or GE1.
- Check that the light on the front is green. If it’s not, try a different LAN or GE port on the Fibre box (ONT).
How to use the Nokia WiFi app
Learn how to use the Nokia WiFi app to help set up your modem.
- Download the Nokia WiFi app from Google Play or App Store.
- Open the app and select Get Started.
- Scan the QR code on the bottom of your modem.
- Follow the instructions in the app to find the best position for your modem. You can skip the step that asks you to insert the SIM - your modem comes with the SIM already inserted.
- If you don't get a great connection right away, use the map at spark.co.nz/max-wireless to find the direction of your nearest 5G cell tower. Then position the modem near a window facing in that direction.
How to check your modem light
The Nokia FastMile 5G Gateway 7 has a single LED on the front of the modem. Its colour and behaviour gives information about what the modem is doing.
Status light when connected to Wireless Broadband
| Light colour | Status | Description |
|---|---|---|
No colour |
Off |
Modem is powered off |
White |
Slow blinking |
Modem is rebooting, or WPS pairing is in progress |
White |
Fast blinking |
Software update is in progress (please don't turn off your modem), or Modem is doing a factory reset, or WPS pairing successful, or Modem is testing the Wireless Broadband signal |
Green |
Blinking |
Modem is starting up |
Green |
Solid |
Connected to the internet |
Yellow |
Solid |
Weak connection to the internet. |
Red |
Blinking |
Modem is doing a factory reset, or Modem is having trouble connecting to the internet |
Red |
Solid |
Poor connection to the internet, or SIM card is locked, missing or faulty |
Status light when connected to Fibre Broadband
| Light colour | Status | Description |
|---|---|---|
No colour |
Off |
Modem is powered off |
Blue |
Solid |
Modem is powering on |
Green |
Solid |
Connected to the internet |
Green |
Blinking |
Connecting to the internet |
Red |
Solid |
Not connected to the internet |
How to connect your devices to WiFi or ethernet
Wireless devices (WiFi)
- Locate your modem’s WiFi name and password on the bottom of the modem.
Tip: If the text is too small to read, try taking a photo of it with your smartphone so you can zoom in for a closer view.
- From your device’s WiFi menu, select the matching WiFi name and enter the WiFi password.
Wired devices (Ethernet)
- Connect the yellow ethernet cable to one of the modem's LAN ports.
- Connect the other end to your device's LAN port.
Manage
How to log in to your modem
Learn how to sign into the modem interface so you can change its settings.
- Open any web browser (such as Chrome, Firefox, Edge).
- In the address bar, type 192.168.1.1 and press Enter.
- You'll then see the Nokia Dashboard, which gives you an overview of the connection status.
- Select Sign in. This option is in the lower left hand corner of the screen.
- Enter the admin username and password. You'll find these on the bottom of your modem.
Tip: If the text on your modem is too small to read, try taking a photo of it with your smartphone so you can zoom in for a closer view.
- Select Sign in.
How to reset your modem to factory settings
Learn how to reboot your Nokia FastMile 5G Gateway 7 or restore it to its factory settings.
Reboot using the reset button
This option won't affect any changes you've made to the modem settings.
- Make sure your modem is powered on.
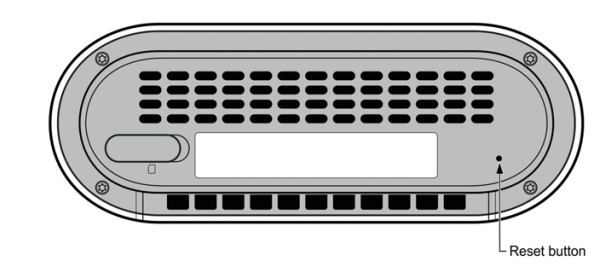
- Insert a paper clip or pin into the reset hole on the bottom of the modem.
- Press the reset button for less than five seconds to reboot the modem.
- Wait for the modem to reboot and the light on the front to turn green again.
Factory reset using the reset button
Please note that by factory resetting your modem, any changes you've made to the modem settings will be restored back to default. This includes your WiFi network name and password.
- Make sure your modem is powered on.
- Insert a paper clip or pin into the reset hole on the bottom of the modem.
- Press the reset button for between 5 and 10 seconds to factory reset the modem.
- Wait for the modem to complete its reset and the light on the front to turn green again.
Reboot or factory reset via the modem interface
Make sure that you're already connected to the modem by an ethernet cable plugged into a laptop or PC (recommended option), or by WiFi.
- Open any web browser (such as Chrome, Firefox, Edge).
- In the address bar, type 192.168.1.1 and press Enter.
- If prompted, select Sign in and enter your username and password to access the modem settings. You'll find the default username and password on the bottom of your modem.
- Select Overview from the menu on the left.
- Click on the image of the FastMile modem.
- Under the Maintenance heading, select Reboot or Reset.
How to set up guest WiFi
Learn how to set up a guest WiFi network on your modem. Guest WiFi networks are a great way to offer your house guests easy access to the internet without also giving them access to your LAN, computers, printers and other WiFi connected devices.
- Open any web browser (such as Chrome, Firefox, Edge).
- In the address bar, type 192.168.1.1 and press Enter.
- If prompted, select Sign in and enter your username and password to access the modem settings. You'll find the default username and password on the bottom of your modem.
- Select WiFi then Guest network from the menu on the left.
- Click the Enable guest network toggle to turn it on.
- Change the Guest network name and password if you wish, then select Save.
How to set up family profiles
Learn how to set up family profiles in the Nokia WiFi app. Setting up family profiles lets you customise WiFi access for each family member by blocking websites, pausing internet access and setting schedules for screen time and bedtime.
- Open the Nokia WiFi app.
- Select Profiles then Create new.
- Enter a name for the profile (for example, Kids).
- Select the checkbox next to each device you want to add to the profile.
- Customise the settings for the profile as needed.

Settings
How to change your WiFi name (SSID) and password
Learn how to change your WiFi network name and password.
If your devices were connected a previous network, changing the WiFi name and password to the same as you had before means most devices can connect automatically.
Change WiFi name and password in the modem interface
- Open any web browser (such as Chrome, Firefox, Edge).
- In the address bar, type 192.168.1.1 and press Enter.
- If prompted, select Sign in and enter your username and password to access the modem settings. You'll find the default username and password on the bottom of your modem.
- Select WiFi then WiFi networks from the menu on the left.
- Select the three dots next to your network name then Edit.
- Enter your new network name and password and select Save.
Change WiFi name and password in the Nokia WiFi app
- Open the Nokia WiFi app.
- Select the pencil icon next to your modem's name in the list of WiFi points to edit.
- A warning message will pop up. Select Continue.
- Enter your new network name and password.
To share the WiFi details using a QR code, select Share Network. You can also select Share on the app's home screen.
How to change your WiFi channel
Learn how to update your WiFi channel and why you may do this.
Locate the best WiFi channel for you
Changing channels can often reduce WiFi interference. This can be especially useful if you live in an apartment with a lot of WiFi networks nearby. To get an idea of which channels are already in use in your home or nearby, try the following mobile apps:
Change your WiFi channel in the modem interface
- Open any web browser (such as Chrome, Firefox, Edge).
- In the address bar, type 192.168.1.1 and press Enter.
- If prompted, select Sign in and enter your username and password to access the modem settings. You'll find the default username and password on the bottom of your modem.
- Select WiFi then WiFi settings from the menu on the left.
- Select the tab for 2.4GHz or 5GHz. You can update both, but you'll need to do them one at a time.
- Next to Channel selection, choose Auto to select a new channel.
- Select Save.
Your WiFi channel is now updated. We recommend trying it out for at least two hours before changing WiFi channels again.
How to turn off the modem light
Learn how to turn off the light on the front of your modem.
- Open any web browser (such as Chrome, Firefox, Edge).
- In the address bar, type 192.168.1.1 and press Enter.
- If prompted, select Sign in and enter your username and password to access the modem settings. You'll find the default username and password on the bottom of your modem.
- Select Overview from the menu on the left.
- Click on the image of the FastMile modem.
- Under the Advanced settings heading, select the LED light toggle to turn it on or off.